WooCommerce Integration
Overview
Monek Checkout for WooCommerce integrates with your store, allowing customers to pay using debit and credit cards, as well as Apple Pay. Simply install the plugin, then either create a new Monek account or connect an existing one to start accepting payments immediately.
System Requirements
Before installing the Monek Checkout plugin, ensure your environment meets the following requirements:
- WordPress: Version 5.0 or later
- WooCommerce: Version 6.0 or later
- PHP: Version 7.4 or later
- SSL Certificate: Your site must use HTTPS
- Administrator Access: Required for plugin installation and configuration
The plugin requires the WooCommerce Checkout block. Legacy checkout shortcode [woocommerce_checkout] is not supported. See Troubleshooting for migration guidance.
Create Checkout Settings
- In the Monek Portal, go to Settings → Integrations and navigate to the WooCommerce Integration tab.

- Click the Create button. A dialog appears prompting you to enter the following details:
- Display Name – this can be any name that helps you identify the configuration.
- Merchant Domain – enter your website’s domain.
- After completing the Create Plugin Settings step, the generated settings (Access Keys and Webhook Secret) will be displayed. Store these securely, as the Access Secret will not be shown again.
- Enter the settings in WordPress by navigating to Admin Area → WooCommerce → Settings → Payments → Monek, then click Save.
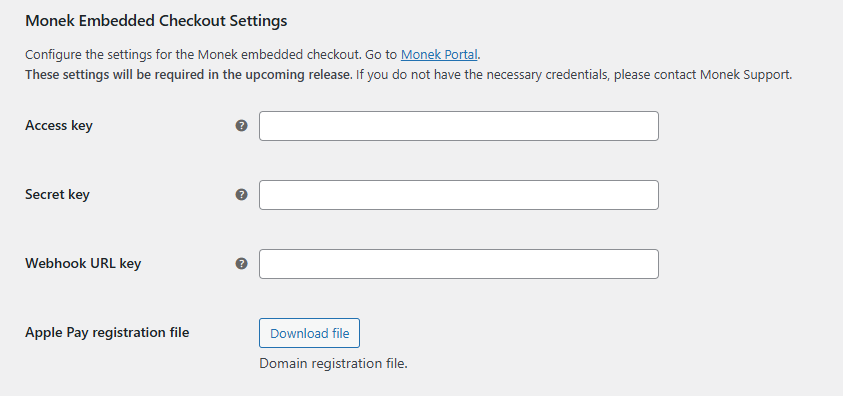
Access Keys
The access keys establish a secure connection to the Monek APIs, enabling payment processing. These can be managed in the Monek Portal on the Integrations page.

Note: The Access Secret cannot be retrieved once created. If it is lost, a new pair of access keys will need to be generated.
Security Best Practices
Protect your integration by following these security guidelines:
- Never commit Access Keys to version control: Store Access Key and Access Secret in environment variables, not in code or configuration files.
- Restrict Access Secret visibility: The Access Secret should only be known to server-side processes and never exposed to frontend code or logs.
- Rotate keys regularly: Generate new access key pairs periodically as part of your security maintenance.
- Use HTTPS only: Ensure all communication with Monek APIs uses HTTPS.
- Monitor webhook integrity: Always verify webhook signatures using your Svix Signing Secret before processing webhook events.
- Limit WordPress user permissions: Only grant WooCommerce → Settings → Payments access to administrators who need it.
- Update plugin regularly: Keep the Monek Checkout plugin updated to receive security patches and improvements.
Webhook Integration
The webhook confirms payment, and the plugin updates the order status to Payment Confirmed. Use this status to track orders that have securely completed the Monek payment flow.
If you prefer to manage order status updates manually, you can remove the Webhook URL Key from the plugin settings.
Additional information about how webhooks and Svix work can be found here.
You can create a webhook by following these steps:
- In the Monek Portal, go to Settings → Integrations and navigate to the Webhooks Integration tab.
- Click Manage to open the Svix page.
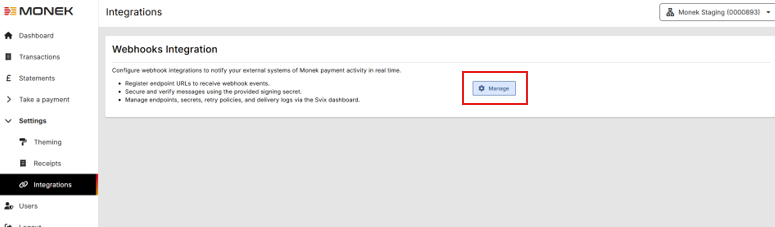
- Within Svix, click Add Endpoint and configure:
- Endpoint URL – This should be your WordPress domain plus
/wp-json/monek/v1/webhook. - Subscribe to events – Subscribe to all events.
- Endpoint URL – This should be your WordPress domain plus
- Once created, copy the Signing Secret from Svix and enter it into your plugin configuration.
Additional information can be found on the plugin store: https://wordpress.org/plugins/monek-checkout/
Testing
Before going live with your integration, thoroughly test your setup using sandbox credentials:
- Configure your WooCommerce settings with sandbox/test Access Keys from the Monek Portal.
- Use test card numbers to verify payment flow. See Test Cards for a complete list of test card numbers and scenarios.
- Test the following scenarios:
- Successful payments
- Declined card scenarios
- Webhook delivery and order status updates
- Apple Pay (if enabled) on supported devices
- Refunds from the WordPress admin panel
- Once satisfied with testing, switch to live credentials in your WordPress settings.
- Monitor your first few live transactions in the Monek Portal to ensure everything is working correctly.
Manual Setup
If you are experiencing issues with the WooCommerce Integration journey, you can do it manually instead. This can be done from the Integrations page under Checkout Access Token. If you want Apple Pay, you will need to follow the steps here.
This will produce the same keys as the WooCommerce Integration, which you can then insert into the Monek plugin.
WooCommerce FAQ
Do I have to set up a webhook?
No, but it is strongly recommended. Webhooks automatically move orders to the correct status after payment. Without webhooks, you will need to update statuses manually.
Do I have to setup Apple Pay?
No, but it will improve your customers’ payment journey. If you don't want Apple Pay and are having issues with the WooCommerce Integration then you may need to follow the Manual Setup instead.
The payment block is greyed out?
This usually means your site is using the legacy WooCommerce checkout shortcode instead of the Checkout block.
How to check
-
In WordPress admin, go to Pages.
-
Edit your checkout page.
-
In WordPress Admin, go to Pages.
-
Edit your Checkout page.
-
Look for the following shortcode in the page content:
[woocommerce_checkout]
If you can see this shortcode, your checkout page is still using the legacy checkout.
How to fix
- Remove the [woocommerce_checkout] shortcode from the checkout page.
- Add the WooCommerce Checkout block.
- Update the page.
- Clear any site/CDN/cache plugin caches and reload checkout.
What's the best way to implement this?
Install the plugin from the WordPress plugin store. In your WordPress admin area, go to Plugins, search for Monek Checkout, install it, and then configure your keys in WooCommerce → Settings → Payments → Monek.
Where do I find my Access Key and Access Secret?
In the Monek Portal, go to Settings → Integrations → WooCommerce Integration and create (or manage) your plugin settings. Your Access Secret is only shown once, so store it securely.
What should I do if I lose my Access Secret?
The Access Secret cannot be recovered after creation. Generate a new set of access keys in the Monek Portal, then update your WooCommerce plugin settings with the new values.
Payments succeed, but the order status does not update. Why?
In most cases, this means webhook delivery is not configured correctly. Check that:
- Your endpoint URL is set to
/wp-json/monek/v1/webhookon your WordPress domain. - You are subscribed to all required events in Svix.
- The Svix Signing Secret in your plugin settings matches the current endpoint secret.
Do I need to subscribe to all webhook events?
Yes, subscribing to all events is recommended to ensure reliable status updates and future compatibility.
Can I use the same integration settings across multiple stores?
It is best to create separate plugin settings per store/domain so each integration is easier to manage and troubleshoot.